How To Make a Crooked Witch Hat

I've always wanted a witch's hat that was crooked and grungy looking. All of the hats that you find at the costume stores are usually satin or velvet or something fancy like that. I wanted something that a real "old hag" would have worn out in the woods, stirring her cauldron full of swamp mud and toad warts.
This hat makes a great decoration, but it also works as a perfect costume hat for a wizard, witch, or scarecrow.
It could also be used as a sorting hat decoration from the Harry Potter franchise.
What You'll Need:
- 2 Yards of burlap
- Scissors
- Marker
- Sewing machine
- Large Sewing Needle
- Twine
- White Glue
- Bucket
- Plastic grocery bags for stuffing
- Tarp
Making the Crooked Witch Hat

Cutting and sewing
We started with some old burlap and cut the peak of the hat by making a large triangle. As you see it here, it's about 24" tall and the bottom 16" across (as shown folded upon itself).

Then Sewed up the side to complete the "Cone".

Then we traced out the outside of the brim. For this one we made it about 24" in diameter. Absolutely don't worry about it being completely round, just get it close. Remember we are looking for an old "crooked" witch hat here. Let that marker wander a little!

Next, we simply cut it out.

Mark out a hole roughly in the middle of the brim about an inch or two smaller than what the bottom of the peak turned out to be (diameter-wise). We cut this hole to about 8" in diameter since the bottom of the peak was 32" in length (16" as shown folded). A 32" circumference gives you about a 10" diameter.

I slid the peak of the hat in through the center and pinned it, right sides together. If you find it doesn't line up just right, you may need to cut the hole a bit bigger or cut some length off of the peak.

Then I sewed this seam using a tight stitch because burlap likes to fray.

Give it character
We made it look kind of ragged, by loosening the burlap around the edges and snipping little holes in it here and there, and tattering out the frayed ends.
Then I used a big upholstery needle and some twine to sew big messy stitches all around the peak to make it look like it had been hand stitched.


Some patches too.

Giving it shape
Then we took an old bucket and mixed about 2 cups of white glue with 2 cups of water. We submerged the hat and soaked it through.
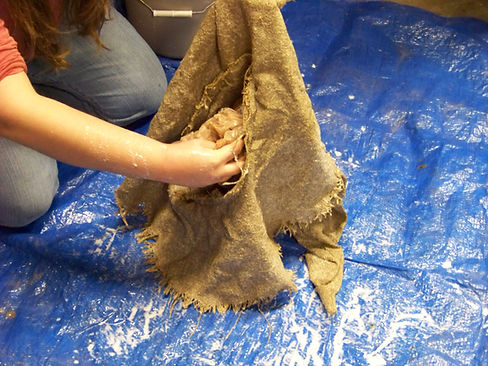
Then squeezed out the majority of the moisture, then stuffed the center peak with old plastic grocery bags. We used plastic because newspapers would just stick to the glue-like paper mache.

Then we laid it out on the tarp and smoothed the brim. While it was wet we arranged all the wrinkles and pleats and crookedness to the brim and peak. I tried to give it a face like the sorting hat in Harry Potter, but it didn't work out so well. Then we let it dry overnight. You can speed the process up with a hair dryer.

When it was dry, we took out all the plastic bags and it was stiff. All the crookedness was now permanent and the brim stood out.

Then we painted it with flat black spray paint. We didn't coat it completely because the dull brown of the burlap showing through gives it a sort of old look. I put the paint on thicker where the wrinkles creased in and it dramatized the dimensions.
For more Halloween Decoration ideas visit these posts: