How To Install An Electric Fence
In this post, I show how to install an electric fence in 6 easy steps.
Please use and install an electric fence system with caution. You are responsible for your safety while installing and using an electric fence.
I am not a vet, this post is not meant to give any medical advice for your animals. Please consult your veterinarian.
This post contains affiliate links which means I get a small commission for any items purchased through that link. It supports our page in a small way! Thanks!
6 Easy Steps To Install an Electric Fence:
- Put up the t-posts or wooden posts
- Attach the appropriate insulators to the posts
- Run the poly wire through the insulators on your posts
- Attach the poly wire to the "hot" terminal of the energizer (power source)
- Drive a grounding rod into the ground near the energizer
- Attach the grounding rod to the "ground" terminal of the energizer and plug it in
Anyone with a basic understanding of electrical wiring and that can handle a few tools can tackle this project. There are a few different options depending on the type of animals you are trying to contain. We break down some of these options below.

We recently decided to give our Jersey heifer (Maple) and our two goats a larger pasture area. The more pasture you can give a grazing animal the better. Large pastures help limit parasite exposure (as the areas with droppings are more spread out), it lends a more varied diet, vegetation re-growth, room to wander and be free, and it cuts WAY down on our hay usage!

With this in mind, grazing animals should be exposed to fresh pasture gradually, as too much fresh grass all at once can cause scours (diarrhea). I always feed a probiotic when changing any of our animal's diets. I like the Probios brand. You give a small scoop once a day with the grain ration and it helps balance out the rumen
Electric Fence Positives:
- Electric fencing is wonderful in that it's less labor-intensive to install
- it can be moved rather easily
- the cost is much lower
- quick to put up
- easy to fix if broken
- can be taken down quickly and easily too
- Can also be used to keep animals out (We started laying an electric fence around our sunflower field to keep the deer, sandhill cranes, and other wild animals out.)
Electric Fence Draw Backs:
- It won't contain all animals. The goats we have now happen to be very mild-mannered, however, if we still had some of the goats we've raised in the past, I know they would be right through that fence. Our cow Maple was shocked twice, once on either end of the pasture and she learned that she won't go beyond the fence.
- It's tricky in remote areas, and you might have to rely on a system with a solar panel.
- You'll need weed management. If the electric fence comes in contact with overgrown weeds it will reduce the power of the shock.
- If the power does go down, or there is a technical problem, your animals can escape, although, once animals are trained they often don't test it again.
- It's...shocking! We have a 5-year-old and luckily she's old enough to know that she shouldn't touch the fence, but if you have younger children it might be a problem. I did touch the fence to test it, and while it's a good zap, it wasn't terrible. Just not pleasant.
Materials we used:
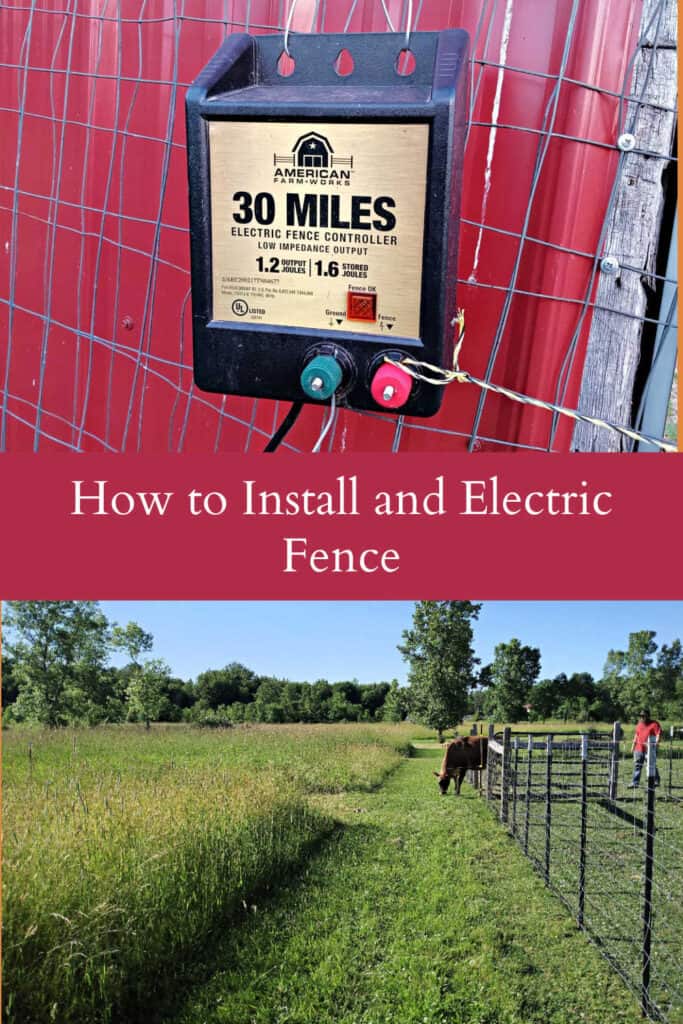
30 Mile Electric Fence charger (make sure the energizer has enough power for your application)
short and long plastic post insulators
Black and Yellow Electric Fence Poly Wire
measuring tape
pliers
wire snips

Where to start:
We started by clearing the tall grass from our hay field. If the fence touches grass or weeds it will zap the grass and short the electrical current, reducing the fence's effectiveness. The mowed path also gave us a path to work in.

1. Drive the T-Posts
Zach drove 6' T-Posts into the ground (about a foot until the spade was just under the ground) every 32 feet. Any closer and we've found the lines tend to droop too much. Ideally the posts, whether you use t-posts or wood posts, should be around 12-15 feet when using poly wire or poly tape. If we end up keeping this small paddock the way it is, we'll end up splitting the difference and adding more posts to close the gaps to 16' apart.

2. Attach the insulators to the posts
Then we clipped the insulators onto the fence posts in three spots down the post. Top, middle, and bottom. If you have difficult livestock, a fourth line might not be a bad idea. Although we are confident this configuration will also keep our two goats contained, this is not what we would suggest for goats. Most goats are much more, well..... adventurous. We've had dozens of goats over the years and the vast majority would run right through these lines to get to the grass just outside the fence.

Near the existing more permanent fence we used the long insulators which hold the electric fence away from the wire fence. As we moved past the wire fence, into the field, we used the shorter insulators. The insulators fit around the T-post and with a little pressure, snap into place. If using wooden fence posts, There are tons of options for ceramic screw-in insulators.

Types of fencing
There are multiple types of fencing wire you can use. Typically there is high tensile, poly wire, or poly tape. We chose to use black and yellow poly wire. We like this type of wire because, in our sunflower field, we remove it after the sunflowers are established and we open for U-Pick. It can be re-wound easily and used year after year as we move our sunflower field in crop rotation. Leaving up a hot wire around a u-pick field might not get the relaxing experience we try to create so being able to take it down in a half hour is extremely helpful. Using a high tensile wire fence requires much stronger corner posts, typically wooden posts, and solid steel electric wire, and would be considered permanent electric fences. They would be a good choice for larger cattle or horses.
3. Run the polywire
Then we ran the poly wire pulling it taught as we went. We used a figure 8 motion at each post insulator with the wire wrapped to secure it. This wrapping isn't necessary, but we've found it tends to keep the "downed" area to a minimum if an animal does decide to run through it and break the wire. In the future, as things loosen (the polyline will stretch if "tested"), we can wrap the insulators an additional time to take up the slack. At some point, we may have to add additional t-posts to add a little rigidity to the lines, but we had these on hand and just wanted to get the project done.

Work from top to bottom
We ran the circumference of our fenced area wrapping the top insulators first, when we had reached the end, we ran the wire down the last pole to the middle insulator being sure not to touch the t-post, and then re-traced our steps running the length of the fenced area wrapping all the middle insulators. When we got to the end, again, we ran the wire to the bottom insulator and traced the length of the fenced area wrapping the bottom insulator clips. You don't need to create a complete loop with the wire. It can simply end abruptly.

4. Attach the poly wire to the terminal
We hung the electric fence energizer box on the outer wall of the barn which connects to our pasture. This is a shared wall with Zach's shop, so there is an outlet through the wall. If your field is too far to plug in directly, there are solar options available.
We chose the 30-mile energizer, which is 1.2 joules. If you need to run more than 30 miles you will need a larger energizer. That 30 miles includes the polylines that run back and forth, top, middle, and bottom.
Problems with not having enough power
If you're running an electric fence in a weedy area, a higher-powered energizer box can help to keep the line electrified even with weeds touching it. If you are running the fence in a remote area they make fence energizers that have a battery and built-in solar charger. Unfortunately, the downside to a solar-powered energizer is the much lower power output (closer to 0.04 Joules) and therefore not great for long distances (only 2 miles) and the jolt it will dish out may not be enough for livestock that needs a little more persuasion.

5. The grounding rod
Next we used a solid copper grounding rod to ground out the energizer. These ground rods can be found at your typical hardware store. Zach pounded it into the ground with the t-post driver.

6. Attach the grounding rod to the terminal
We ran the grounding wire from the negative lead on the energizer to the grounding rod and secured it with a grounding rod clamp. Then we ran the poly wire to the positive terminal on the energizer and plugged it in.


This grounding system completes the electrical circuit from the hot wire back to the ground wire side of the energizer.
Just take caution that the poly wire is going straight from the first insulator on the fence to the terminal on the energizer. If it's drooping and swinging in the wind, it may touch something else and "short" the line making the fence rather ineffective.
A word of caution
When someone touches the wire and is also touching the ground (the earth below you) the circuit is completed by your body and quickly takes the path of least resistance. High voltage pulses are now flowing freely through your body getting your attention immediately. If you were to take your shoes off, you'd notice a stronger shock as you now have less insulation between you and the ground. It shouldn't knock you off your feet (assuming you don't have a pacemaker or other major medical issues), but an electric shock isn't really an experience you'd want to repeat.

How our animals reacted to the new fence
In 2 zaps Maple was trained. The first time she bumped her nose to the fence, she jumped and kicked backward. Then she stood there for a couple of seconds staring at the fence, then got right back to grazing. As she grazed across the pasture, she made her way to the other side and bumped her nose again. This time she barely raised her head and just kind of snorted, then continued grazing.
We've had it in place for almost 3 weeks now and no escape attempts have been made. In fact, the fence has been unplugged for 2 days (because we're tying in another fence line to the U-Pick sunflower field) and all the animals have stayed in the pasture. Everyone is very content with the new pasture. Because we are relying solely on the electric fence without a physical barrier we may need to check for breaks in the line on a regular basis.
Shop this post!
30 Mile Electric Fence charger (make sure the energizer has enough power for your application)
short and long plastic post insulators
Black and Yellow Electric Fence Poly Wire
measuring tape
pliers
wire snips
Probios brand Probiotics
Pin it for later!